Thursday, 25 July 2019

Inbound Interface in Oracle Apps


Inbound Interface :

Create control file and call sql loader using HOST as executable
/* -----------------------
   || Call SQL Loader Program
   || -----------------------
   || This should be done using the below command.
   || If 0 is returned then it has not worked.  Otherwise the concurrent
   || request ID is returned
   */
  
   FND_FILE.PUT_LINE(FND_FILE.LOG,'Load PO Data : Submitting SQL*Loader');
  
   l_request_id := FND_REQUEST.submit_request ( application => 'EQXX'
                                               ,program     => 'E_PO_SQL_LOADER'
                                               ,description => Data Load script for PO Generic Interface'
                                               ,argument1   => p_data_file
                                               ,argument2   => l_control_file
                                               );
                                                    
  
   IF l_request_id = 0 THEN
      -- Request could not be started => Inform Integration Module and Raise Exception
      RAISE e_submit_loader_error;
   ELSE
      -- Request initialised succesfully => Wait for completion and Check status
      COMMIT; -- This will start the request
  
      FND_FILE.PUT_LINE(FND_FILE.LOG,'Load Data : Waiting for SQL*Loader');
     
      l_dummy := FND_CONCURRENT.wait_for_request ( request_id => l_request_id
                                                 , phase      => l_conc_phase  
                                                 , status     => l_conc_status   
                                                 , dev_phase  => l_conc_dev_phase 
                                                 , dev_status => l_conc_dev_status
                                                 , message    => l_conc_message   
                                                 );

      IF l_dummy = TRUE THEN
         FND_FILE.PUT_LINE(FND_FILE.LOG,'The Concurrent Request has returned TRUE');
      ELSE
         FND_FILE.PUT_LINE(FND_FILE.LOG,'The Concurrent Request has returned FALSE');
      END IF;

      IF UPPER(l_conc_status) IN ('ERROR','WARNING') THEN
         RAISE e_load_error;
      END IF;
   END IF;

   FND_FILE.PUT_LINE(FND_FILE.LOG,'Load PO Data : Source Systems : ' || p_source);

2/ E_PO_SQL_LOADER is concurrent program and acting as executable , and executable type is HOST
3/ HOST program is calling .prog extension program which contains unix script to call sql loader script 
4/ first 4 parameters are reserve for unix shell scripting (from 0 to 4)
5/ Code in prog should be like as below:
# submit SQL*Loader
sqlldr $v_id_pswd control=$EQU_TOP/bin/$v_sqlldr_ctl \
                  data=$v_filename \
                  bad=$EQU_TOP/bin/POSQL_$v_request_id.bad \
                  log=$EQU_TOP/bin/POSQL_$v_request_id.log

where control and data file are coming from concurrent program parameter
eval v_filename=$5
v_sqlldr_ctl=$6
6/ control file should be present in custom top / bin folder
7/ Call concurrent program by fnd_request.submit_Request
   l_request_id := FND_REQUEST.submit_request ( application => 'EXX'
                                               ,program     => 'E_PO_SQL_LOADER'
                                               ,description => ' Data Load script for PO Generic Interface'
                                               ,argument1   => p_data_file
                                               ,argument2   => l_control_file
                                               );
                                                    
8/ After successful execution of loader , data is present in staging tables
9/ Now run the concurrent program that will take data from staging table, put validations and insert into mtl_system_items_interface , mtl_item_categories_interface, PO _headers_interface,po_lines_interface
10 / Then call standard concurrent program to submit from interface to base table
11/ program name : Import Standard Purchase Orders
12/ Import Items
13/Item Organization Assignment


2/ For supplier import :
First create control file and check data file format and then create host program to call .prog file , which will call sql loader and data insert into staging tables
Pre-requisites setup’s are: Payment terms, Pay Groups, CCID, Supplier classifications, Bank Accounts , Employees (if employees have to set up as vendors).
The Interface Tables are:
§  AP_SUPPLIERS_INT
§  AP_SUPPLIER_SITES_INT
§  AP_SUP_SITE_CONTACT_INT

Mandatory Columns:
§  VENDOR_SITE_INTERFACE_ID (ap_supplier_sites_int_s.NEXTVAL) – Supplier Site interface record unique identifier
§  VENDOR_SITE_CODE – Supplier Site name

Interface programs:
1.     Supplier Open Interface Import
2.     Supplier Sites Open Interface Import
3.     Supplier Site Contacts Open Interface Import

The data inserted via these interfaces are automatically populated into TCA tables.
Note: AP_SUPPLIER_INT_REJECTIONS table contains suppliers, sites, contacts rejections information.

3/ For Customer Import
First create control file and check data file format and then create host program to call .prog file , which will call sql loader and data insert into staging tables

   Interface Tables
·           RA_CONTACT_PHONES_INTERFACE
·         RA_CUSTOMER_PROFILES_INTERFACE
·         RA_CUSTOMER_INTERFACE
·         RA_CUSTOMER_BANKS_INTERFACE
·         RA_CUST_PAY_METHOD_INTERFACE

Mandatory columns:
·         ORG_ID
·         ORIG_SYSTEM_CUSTOMER_REF
·         INSERT_UPDATE_FLAG
·         CUSTOMER_NAME
·         CUSTOMER_NUMBER (if you are not using Automatic Customer Numbering)
·         CUSTOMER_STATUS
·         LAST_UPDATED_BY
·         LAST_UPDATE_DATE
·         CREATED_BY
·         CREATION_DATE

Then run the Customer Interface program to validate your imported data and transfer the data to the Customer tables within your system
Customer Interface transfers customer data from the interface tables into the following tables:
·         HZ_CONTACT_POINTS
·         HZ_CUST_ACCT_RELATE_ALL
·         HZ_CUST_ACCT_ROLES
·         HZ_CUST_ACCT_SITES_ALL
·         HZ_CUST_ACCOUNTS
·         HZ_CUST_PROFILE_AMTS
·         RA_CUST_RECEIPT_METHODS
·         HZ_CUST_SITE_USES_ALL
·         HZ_CUSTOMER_PROFILES
·         HZ_LOCATIONS
·         HZ_ORG_CONTACTS
·         HZ_PARTIES
·         HZ_PARTY_SITES
·         HZ_PERSON_PROFILES
·         AP_BANK_ACCOUNT_USES
·         AP_BANK_ACCOUNTS
·         AP_BANK_BRANCHES
The Customer Interface program will not allow updates to the following tables:
·         HZ_CUST_ACCT_RELATE_ALL
·         HZ_CUST_SITE_USES_ALL
·         RA_CUST_RECEIPT_METHODS
·         AP_BANK_ACCOUNT_USES
·         AP_BANK_ACCOUNTS
·         AP_BANK_BRANCHES


Friday, 19 July 2019

How to Use HOST as executable in Oracle apps / Send Mail to Business via mailx utility


How to send mail in oracle : Using Mailx utility : Using HOST as executable
UNIX is the most widely used Operating system for Oracle Apps Implementation. Shell script is default programming language for UNIX. Simply we can say, UNIX host based concurrent program is actually a shell script. Unix host based concurrent program executes all command written in shell script and returns control back to the concurrent manager with the exit code.
Exit code in Unix concurrent program:
§  = 0 – program completed successfully
§  > 0 – program completed in error

Create a UNIX concurrent program which emails a file from a location or concurrent program output to a user using mailx utility Concurrent program parameters,


From
To
CC
BCC
Subject
File Location
Table of Contents
·         Pre-Requisite
·         Step1- Create shell script(.prog)
·         Step2- FTP this file to CUSTOM_TOP/bin path
·         Step3: create a soft link to FNDSPESR
·         Step4: register executable
·         Step 5: register concurrent program
Pre-requisite
You should have a working knowledge of Oracle Apps and Basic knowledge of Unix command.
Software/Hardware environment
§  Oracle apps 11i or R12
§  Putty
§  Winscp
Steps To Register Unix Shell Script As A Concurrent Program
Step 1 – Create shell script (. prog)
Let’s create an executable file first. It is a text file with .prog extension. As per Oracle Apps Developer Guide, the extension should be .prog.
In Unix based concurrent program, first 5 parameters from $0 to $4 are reserved and used by Oracle to pass below information to the shell script. User-defined parameters start from $5 onwards.
Note: This is applicable when there exists a link to fndscpr file.

 
— Standard Parameter—
Below parameters from $0 to $4 are reserved to hold information.
$0: Shell script to be executed
$1: Oracle user/password
$2: Applications user_id
$3: Application user_name
$4: Concurrent program request_id
— User-defined parameters—-
$5 Onwards are the custom parameters.
$5: From
$6: To
$7: CC
$8: BCC
$9: Subject
$10: File Path
Note: some Unix operating system you need to use curly brackets when parameter numbers are two digits {$10} or use Unix SHIFT command to shift parameter to $9 position. Check file below for to understand shift command.
# Name:- xxhost_conc_demo.prog
# Description:- Demo script to send email
# parameters
#  From
#  To
#  CC
#  BCC
#  Subject
#  File Name

echo "print reserved parameter"

echo "0 - Shell Script " $0
echo "1 - Oracle user/password" $1
echo "2 - Applications user id" $2
echo "3 - Application user name" $3
echo "4 - Concurrent program request id" $4

echo

echo "print custom parameter"
echo "5 - From" $5
FROM=$5

echo "6 - To" $6
TO=$6

echo "7 - CC" $7
CC=$7

echo "8 - BCC" $8
BCC=$8

echo "9 - Subject" $9
SUB=$9
shift                     # this shift 10th parameter to 9th position
echo "10 -File Name" $9   # referring 10th parameter as 9th
FILE=$9

# send email using mailx command
echo "Testing Unix Host Based concurernt Program" | mailx -s $SUB -c $CC -b $BCC -r $FROM -a $FILE $TO

Step 2 – FTP this file to $XXCUSTOM_TOP/bin path
FTP this script using WinSCP or FILEZILLA to respective $XXCUSTOM_TOP/bin. Host program executable file always put under /bin directory. Make sure encoding of the script should be in Unix format else you will get an error while running the script 
Login to Unix Server using putty and change file permission to 755 using below command,
chmod 755 xxhost_conc_demo.prog

Above step is required to avoid file permission error, else you will get FND-CP-ESP: Child: exec:: Permission denied error. It happens because Oracle Unix user cannot execute the script.
FND-CP-ESP: Child: exec:: Permission denied
/atech/app/xxcust/12.0.0/bin/xxhost_conc_demo
Program exited with status 1
Step 3 – Create a soft link to FNDCPESR
All parameters to shell script are passed as a single concatenated string. You need to either parse and split these parameters using SED, CUT commands or create a soft link to FNDCPER program. This is a standard utility by the oracle which parses parameter passed to the Unix program from the concurrent program and properly segregates them as $0,$1 .. $n.
ln -s $FND_TOP/bin/fndcpesr  xxhost_conc_demo

Do not include .prog extension.
Step 4 – Register executable
Register executable for the program as shown in below image. Navigation Application Developer–> Define–> Executable.
Execution Method: Host

Execution File Name: 
xxhost_conc_demo ( name of file without .prog extension)
Step 5 – Register Concurrent Program
Navigate and register a concurrent program. Select executable name defined in the previous step.


Sample Log File
Below if log file which will help you to understand the how parameters are passed.
+—————————————————————————+
Current system time is 25-OCT-2017 03:51:03
+—————————————————————————+
print reserved parameter
0 – Shell Script /atech/app/xxcust/12.0.0/bin/xxhost_conc_demo
1 – Oracle user/password APPS/apps
2 – Applications user id 45878
3 – Application user name SHOKEEN
4 – Concurrent program request id 90315090
print custom parameter
5 – From vivek@mydemoserver
6 – To shokeen@gmail.com
7 – CC shokeen@gmail.com
8 – BCC ashokeen@gmail.com
9 – Subject Testing
10 -File Name /home/shokeen/sample_file
+—————————————————————————+
No completion options were requested.


Wednesday, 22 May 2019

Bulk collect and for all in Oracle for performance tuning

Hello There,
Here I am describing a small example of bulk collect and for all clause.This will helpt the execution time of query executed

Before how it work
A quick glance at the following Code should make one point very clear: This is straightforward code; unfortunately, it takes a lot of time to run - it is "old-fashioned" code, so let's improve it using collections and bulk processing.
CREATE OR REPLACE PROCEDURE test_proc IS
BEGIN
  FOR x IN (SELECT * FROM all_objects)
  LOOP

    INSERT INTO t1
    (owner, object_name, subobject_name, object_id,
     data_object_id, object_type, created, last_ddl_time,
     timestamp, status, temporary, generated, secondary)
    VALUES
    (x.owner, x.object_name, x.subobject_name, x.object_id,
    x.data_object_id, x.object_type, x.created,
    x.last_ddl_time, x.timestamp, x.status, x.temporary,
    x.generated, x.secondary);
  END LOOP;
  COMMIT;
END test_proc;
/
CREATE TABLE t1 AS SELECT * FROM all_objects WHERE 1 = 2;
SQL> set timing on;
SQL> exec test_proc;

PL/SQL procedure successfully completed.

Elapsed: 00:00:12.84
SQL> exec test_proc;

PL/SQL procedure successfully completed.

Elapsed: 00:00:15.03
SQL> exec test_proc;

PL/SQL procedure successfully completed.

Elapsed: 00:00:12.54
Very slow - do not use it in that way!
USING Bulk Collect: 
Converting to collections and bulk processing can increase the volume and complexity of your code. If you need a serious boost in performance, however, that increase is well-justified.
Collections, an evolution of PL/SQL tables that allows us to manipulate many variables at once, as a unit. Collections, coupled with two new features introduced with Oracle 8i, BULK_COLLECT and FORALL, can dramatically increase the performance of data manipulation code within PL/SQL.
CREATE OR REPLACE PROCEDURE test_proc (p_array_size IN PLS_INTEGER DEFAULT 100)
IS
TYPE ARRAY IS TABLE OF all_objects%ROWTYPE;
l_data ARRAY;

CURSOR c IS SELECT * FROM all_objects;

BEGIN
    OPEN c;
    LOOP
    FETCH c BULK COLLECT INTO l_data LIMIT p_array_size;


    FORALL i IN 1..l_data.COUNT
    INSERT INTO t1 VALUES l_data(i);


    EXIT WHEN c%NOTFOUND;
    END LOOP;
    CLOSE c;
END test_proc;
/
SQL> exec test_proc;

PL/SQL procedure successfully completed.

Elapsed: 00:00:03.34
SQL> exec test_proc;

PL/SQL procedure successfully completed.

Elapsed: 00:00:03.20
SQL> exec test_proc;

PL/SQL procedure successfully completed.

Elapsed: 00:00:03.90
Eliminate CURSOR LOOP at all
You may eliminate the CURSOR Loop at all, the resulting Procedure is compacter and the performance is more or less the same.
CREATE OR REPLACE PROCEDURE test_proc
IS
TYPE TObjectTable IS TABLE OF ALL_OBJECTS%ROWTYPE;
ObjectTable$ TObjectTable;


BEGIN
   SELECT * BULK COLLECT INTO ObjectTable$
     FROM ALL_OBJECTS;


     FORALL x in ObjectTable$.First..ObjectTable$.Last
     INSERT INTO t1 VALUES ObjectTable$(x) ;

END;
/
SQL> exec test_proc;

PL/SQL procedure successfully completed.

Elapsed: 00:00:03.51
SQL> exec test_proc;

PL/SQL procedure successfully completed.

Elapsed: 00:00:03.35
SQL> exec test_proc;

PL/SQL procedure successfully completed.

Elapsed: 00:00:04.46

Thanks for reading the document. 

Calling a Sub Template from Main Template in Oracle XML Publisher

Hello there,

Please go through the document of how to use subtemplate

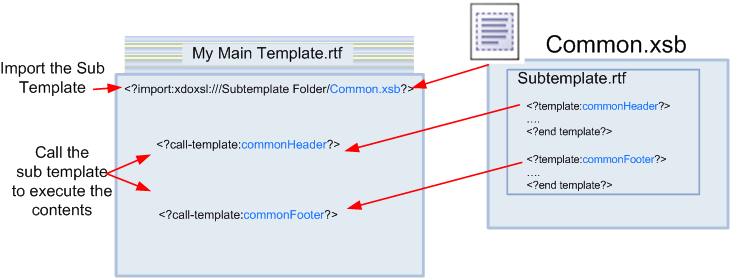
There are two entries that you must make to call a subtemplate from a main template.
To implement the subtemplate in a main template, you must make two entries in the main template:
First, import the subtemplate file to the main template. The import syntax tells the BI Publisher engine where to find the Sub Template in the catalog.
Second, enter a call command to render the contents of the subtemplate at the position desired.

Importing the Subtemplate to the Main Template

Enter the import command anywhere in the main template prior to the call template command.
If you do not require a locale, enter the following:
<?import:xdoxsl:///path to subtemplate.xsb?>
where
path to subtemplate.xsb is the path to the subtemplate .xsb object in the catalog.
For example:
<?import:xdoxsl:///Executive/HR_Reports/mySubtemplate.xsb?>
Note:
If the subtemplate resides in a personal folder under My Folders, the command to import the subtemplate is:
<?import:xdoxsl:///~username/path to subtemplate.xsb?>
where username is your user name.
For example, if user myuser uploads a subtemplate called Template1 to a folder called Subtemplates under My Folders, the correct import statement is:
<?import:xdoxsl:///~myuser/Subtemplates/Template1.xsb?>

Calling the Subtemplate to Render Its Contents

You can also enter a call command to render the contents of the subtemplate at the position that you desire.
To call the subtemplate to render its contents:
  • In the position in the main template where you want the subtemplate to render, enter the call-template command, as follows:
    <?call-template:template_name?>
    
    where
    template_name is the name you assigned to the contents in the template declaration statement within the subtemplate file (that is, the <?template:template_name?>statement).
The following figure illustrates the entries required in a main template:

Importing a Localized Subtemplate

To designate the locale of the imported subtemplate, append the locale to the import statement as shown here.
<?import:xdoxsl:///{path to subtemplate.xsb}?loc={locale_name}?>
where
path to subtemplate.xsb is the path to the subtemplate .xsb object in the catalog
and
locale_name is the language-territory combination which comprises the locale. The locale designation is optional.
For example:
<?import:xdoxsl:///Executive/HR_Reports/mySubtemplate.xsb?loc=en-US?>
Note that you can also use ${_XDOLOCALE} to import a localized subtemplate based on the runtime user locale. For example:
<?import:xdoxsl:///Executive/HR_Reports/mySubtemplate.xsb?loc=${_XDOLOCALE}?>


Example

In this example, your company address is a fixed string that is displayed in all your templates. Rather than reproduce the string in all the templates, you can place it in one subtemplate and reference it from all the others.
To place the string in a subtemplate and reference it:
  1. In an RTF file enter the following template declaration:
    <?template:MyAddress?>
    My Company
    500 Main Street
    Any City, CA 98765
    <?end template?>
    
  2. Create a Sub Template in the catalog in the following location: Customer Reports/Templates.
  3. Upload this file to the Sub Template and save it as "Common Components" (BI Publisher assigns the object the .xsb extension).
  4. In the main template, enter the following import statement in a form field or directly in the template:
    <?import:xdoxsl:///Customer Reports/Templates/Common Components.xsb?>
    
  5. In the main template, in the location you want the address to appear, enter:
    <?call-template:MyAddress?>
At runtime the contents of the MyAddress subtemplate are fetched and rendered in the layout of the main template.

Thanks for reading.

Saturday, 29 July 2017

JDR Tables in OAF (oracle application Framework)

Hello

We do have only four tables in complete OAF and one API .

Listed out four tables :

  1. JDR_PATHS: Stores the path of the documents, OA Framework pages and their parent child relationship.
  2. JDR_COMPONENTS: Stores components on documents and OA Framework pages.
  3. JDR_ATTRIBUTES: Stores attributes of components on documents and OA Framework pages.
  4. JDR_ATTRIBUTES_TRANS: Stores translated attribute values of document components or OA framework pages.
and One API

JDR_UTILS

ListDocument: Provide full path of document:

only listdocument will contain two paramters, first is path and second is boolean value (true)

DECLARE
BEGIN
jdr_utils.listdocuments(‘/oracle/apps/icx/por/rer/server’, TRUE);
END;

ListCustomizations: From this we can check whether view has been extended or not

PRINTDOCUMENT: To get the XML of the object passed as parameter. 
DECLARE
BEGIN
jdr_utils.printdocument('
/oracle/apps/icx/por/req/server/customizations/site/0/xxPORequisitionLinesVO');
END;

DELETEDOCUMENT: if you want to delete the customizations then it will be Use to delete the customization.

DECLARE
BEGIN
jdr_utils.deletedocument(‘/oracle/apps/icx/por/req/server/customizations/site/0/xxPORequisitionLinesVO’);
END;

Friday, 21 July 2017

why power button on our laptops has that particular symbol

The reason why power button on our laptops has that particular symbol is :

Power on is represented by the below image (binary digit 1)

Power off is represented by the below symbol (binary digit 0)

Since Power button is used for both on and off (stand by), power button got that particular symbol.