Monday, 7 October 2024

VB migration from Gen2 to Gen3 > OAUTH Setup for OIC Integration Rest APIs invocation- Gen3

 Hi ,

Below is the steps to migrate VB application from GEN2 to GEN3 and set OAUTH in to it.

1> In OIC Gen2, OIC had the same URLs for design time and runtime APIs. However, in Gen3, OIC has separated its design time and runtime under different URLs.

2> The runtime URL is something like https://oic-dev-environment-ia.integration.us-region-1.ocp.oraclecloud.com/ic/api/xxxxx

3>Design time URL starts with design.integration and always has a query parameter representing the instance, 
such as https://design.integration.us-region-1.ocp.oraclecloud.com/ic/api/xxxxx/?integrationInstance=...

4> The first part of the URL https://design.integration.region.ocp.oraclecloud.com is your rest-server and the rest of the URL integrationInstance=NameOfServiceInstance contains the name of the service instance.

Example: https://design.integration.region.ocp.oraclecloud.com/?integrationInstance=NameOfServiceInstance

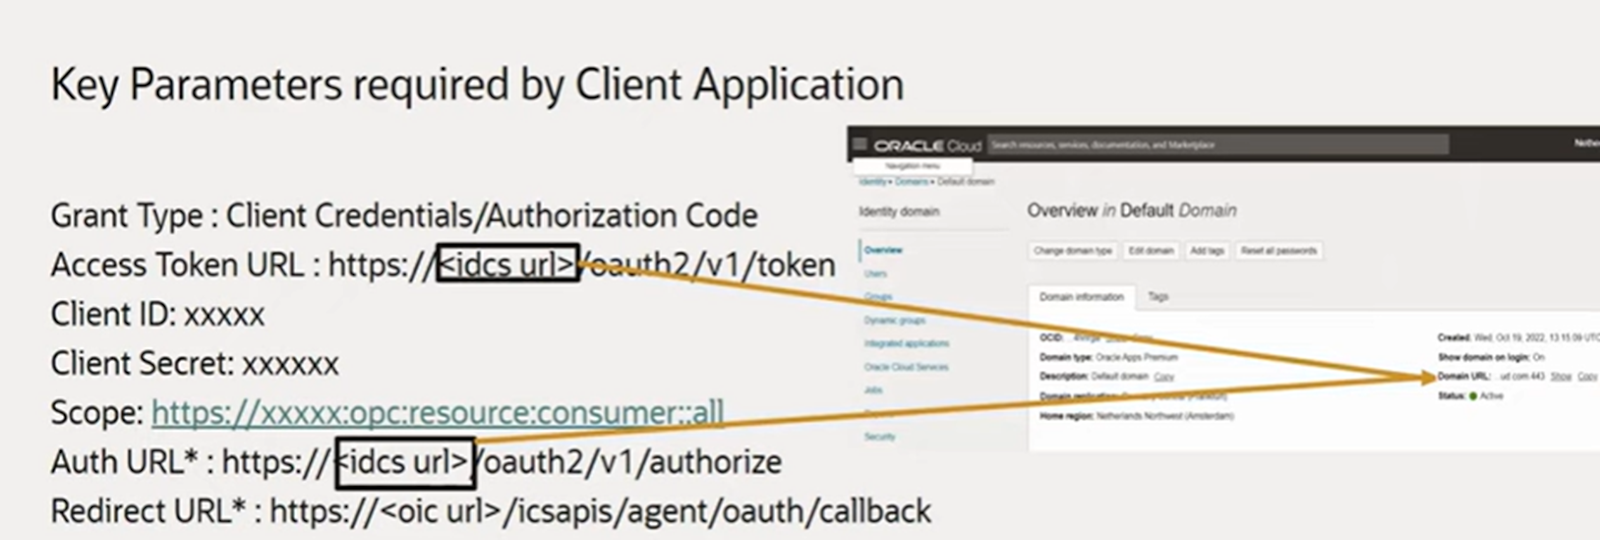
We require below 5 parameters from IAM 

Grant Type
Access Token URL
Client Id
Client Secret
Grant Type


Steps to Get OAUTH Parameters from IAM Console:

Login to :  https:[IDCS URL]/ui/v1/adminconsole

View the Oracle Cloud Services item in the left-hand navigation menu


go to 


For Scope , copy SCOPE value 
Uploading: 134341 of 134341 bytes uploaded.


To get client Id and Secret , see below


All Key Values in Nutshell


All Details:

Token URL : https://idcs-XXXXXX/oauth2/v1/token
Client ID:      1dxxxxxxxxxxxxxxxxxxxxxxx7c
Client Secret :  afxxxxxxxxxxxxxxxxxxxxxxxxxx17
scope: https://XXXXXXXXXXXXXXXXXXXXXXXXXXXXXXX:opc:resource:consumer::all

Now , Export VB application from GEN2 to GEN3 . 

Login to OIC application in GEN3 .


click on Visual Builder and go to service connection and see backend


Create one backend conection, This backend will act as a package or kind of single point of contact for GEN3 credentials.

We can create new service connection and refer this Backend . Or we can leverage this new backend connection in existing service connection. 


use OAUTH2.0 Client Credentials from Authentication:

Instance URL will be Design Time URL of OIC application 

https://*******************cloud.com 


Enter Client Id, Client Secret, Scope, Token URL as we have collected from IAM (see above point)


select connection type as "Dynamic, Service does not support CORS"


Now save it and close it.

Now go to service connection, and open existing service connection . 

Change the existing service connection to new BACKEND (which created above. i.e. OICGEN3)


Now go to ENDPOINTS in SERVER itself and enter endpoint, Let suppose we are GET as method to extract all integration details from a particular Lookups then we can leverage below.


For example if you want to call particular lookup which is holding all your integrations in OIC, then call that particular lookup and put name 

Make sure we need to provide 'integrationInstance' Name as "Static Parameter" in Backend itself.


To Retrieve lookup we can use oracle standard format.


Path: /ic/api/integration/v1/lookups/{name}

So our final URL will be like as below 

https://XXXXXXXX.oraclecloud.com/ic/api/integration/v1/lookups/TEST_CONFIG?expand=datarow&onlyData=true&integrationInstance=XXXXX

Run and test it . It will work succesfully.

Same thing we can achieve via POSTMAN , just use CLIENT CREDENTIALS as GRANT TYPE and fill all the information and generate TOKEN. it will work further.

Same Fashion we can use in OIC also, Just enter all information in REST CONNECTION TYPE and put mapping for "integrationInstance" name. It should work.

Thanks.

Happy Learning. 

For More information, please drop your comment here . 

Monday, 29 July 2024

How to Split CLOB column data into different rows - SQL PL SQL - Oracle

  SELECT DISTINCT

        PROJECT_NAME_ALIAS,

        USER_EMAIL,

        REGEXP_SUBSTR(MODULE_NAME, '[^:]+', 1, LEVEL) AS MODULE_NAME,

        LEVEL

    FROM 

        XXUSER_PROJECTS_MODULES

    WHERE 

       PROJECT_NAME_ALIAS like 'A%'

            CONNECT BY 

        REGEXP_SUBSTR(MODULE_NAME, '[^:]+', 1, LEVEL) IS NOT NULL

        AND PRIOR SYS_GUID() IS NOT NULL


        select * from XXUSER_PROJECTS_MODULES

        where project_name_alias like 'A%'


if modules are stored as below 


Thursday, 4 July 2024

How to add page number in rtf templates in body - Oracle - Fusion

 If there is a requirement to add current page number and total page number in body of RTF template not in header and footer. Please check following.

For current page number, use <fo:page-number xdofo:report-page-number="true"/>

For total page number, use <?fo:page-number-citation:xdofo:lastpage-totalpg?>

Wednesday, 3 July 2024

How to start new section in RTF template in oracle fusion

Hi Team, 

If you have requirement where you want to display new page for each invoice then below section is for you. 


Happy Learning. 

<LIST_G_INVOICE>
   <G_INVOICE>
      <BILL_CUST_NAME>Vision, Incusive </BILL_CUST_NAME>
      <TRX_NUMBER>234568</TRX_NUMBER>
      ...
   </G_INVOICE>
   <G_INVOICE>
      <BILL_CUST_NAME>BCD </BILL_CUST_NAME>
      <TRX_NUMBER>234</TRX_NUMBER>
      ...
   </G_INVOICE>
   ...
</LIST_G_INVOICE>
...

Each G_INVOICE element contains an invoice for a potentially different customer. To instruct BI Publisher to start a new section for each occurrence of the G_INVOICE element, add the @section command to the opening for-each statement for the group, using the following syntax:

<?for-each@section:group name?>

where group_name is the name of the element for which you want to begin a new section.

For example, the for-each grouping statement for this example is as follows:

<?for-each@section:G_INVOICE?>

The closing <?end for-each?> tag is not changed.

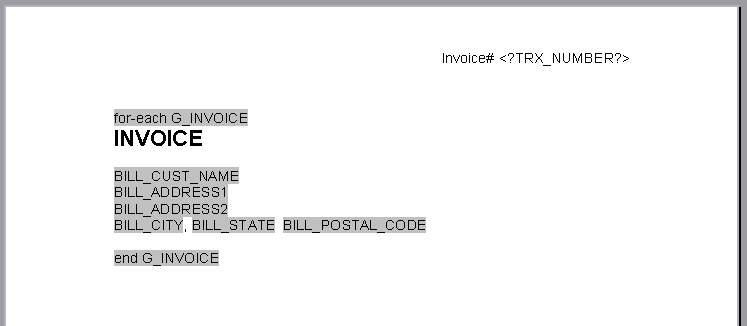
The following figure shows a sample template for batch reports:

Note:

The G_INVOICE group for-each declaration is still within the body of the report, even though the headers are reset by the command.

Description of GUID-4782470C-48F5-4F97-B5F6-98F94D1F05F4-default.gif follows


The following table describes the values of the form fields from the template in the previous figure (that shows a sample template for batch reports):

Default Text EntryForm Field Help TextDescription

for-each G_INVOICE

<?for-each@section:G_INVOICE?>

Begins the G_INVOICE group, and defines the element as a Section. For each occurrence of G_INVOICE, a new section is started.

Thursday, 27 June 2024

Few Dates format in RTF template Oracle fusion

 <?format-date:ASSIGNMENT_POSTING_DATE;’XDODEFDATE’?>

<?format-number:BASE_SALARY_NEW;’D999'?>


<?format-date: ACCT_DATE;’YYYY/MM/DD’?>


<?format-date:xdoxslt:sysdate_as_xsdformat();’DD MON YYYY’?>


<?format-date:<?format-date:ASSIGNMENT_START_DATE?;'DD-MON-YYYY'?>;'YYYY-MM-DD'?>


<?format-date:ASSIGNMENT_START_DATE;'DD-MON-YYYY'?>


<?format-date:PERIOD_START_DATE;'XDODEFDATE'?>


<?xdofx:to_date(COMP_1_COMPENSATION_EFF_DATE,'Mon YYYY' )?>


<?format-number:BASE_SALARY_NEW;’D99'?>


How to create dependent LOV in Oracle APEX fusion

 1. Create one lookup table and enter lookup_type column as per need .  For example below.

select LOOKUP_VALUE, lookup_code

from XXXX_APPLICATION_LOOKUP

where lookup_type= 'OFFERINGS'

2. Select column which is based on above "OFFERINGS", select type as "LOV"

3. Go to Next Column which is based on previous column , Step 2. (output of step2)

4. Put Value in any "ATTRIBUTES" say ATTRIBUTE1 in XXXX_APPLICATION_LOOKUP.

That value is based on Master value and will act as Mapping

Say : OFFERING is ERP 

and MODULE is Finance.

so put value in "LOOKUP_TYPE" as "MODULE" and put 

Lookup_value as "Finance"

and in ATTRIBUTE1 as "ERP"

it will create as MAPPING between two datas.

put below query in target LOV (or Child LOV)

where P9_REGION in below query is Name of Master LOV 

Query :


select lookup_value , lookup_code

from XXXX_APPLICATION_LOOKUP

where lookup_type= 'COUNTRY' 

and attribute1 in (select regexp_substr (

           :P9_REGION,

           '[^:]+',

           1,

           level

         ) value

  from  dual

  connect by level <=

    length ( :P9_REGION ) - length ( replace ( :P9_REGION, ':' ) ) + 1)


How to create TILES in APEX Oracle

 1. Create New Application and its respective page.

2. In the "Region" Create Type as "Card" and add below query .

The more the unions, more the TILES.

In below Query : 

"'f?p=&APP_ID.:33:&SESSION.::&DEBUG.:::' target_url"

33 is page number where your TILE will navigate 

Query :

select

  -- data

  1 card_primary_key,    -- primary key

  null card_secondary_key,  -- secondary key if needed

  'Manage Projects' card_title,          -- title

  null card_subtitle,       -- subtitle

  'View Assigned Projects' card_body,           -- card body text

  null card_secondary_body, -- card secondary text, positioned near bottom

  'fa fa-plus-square' card_icon ,          -- icon class, e.g. fa-cloud

  'f?p=&APP_ID.:33:&SESSION.::&DEBUG.:::' target_url

from dual

union


select

  -- data

  2 card_primary_key,    -- primary key

  null card_secondary_key,  -- secondary key if needed

  'Project Access Request' card_title,          -- title

  null card_subtitle,       -- subtitle

  'Submit Project Access Request' card_body,           -- card body text

  null card_secondary_body, -- card secondary text, positioned near bottom

  'fa fa-bar-chart' card_icon ,          -- icon class, e.g. fa-cloud

  'f?p=&APP_ID.:17:&SESSION.::&DEBUG.:::' target_url

from dual


Refer Below as screenshot