Monday, 7 October 2024

VB migration from Gen2 to Gen3 > OAUTH Setup for OIC Integration Rest APIs invocation- Gen3

 Hi ,

Below is the steps to migrate VB application from GEN2 to GEN3 and set OAUTH in to it.

1> In OIC Gen2, OIC had the same URLs for design time and runtime APIs. However, in Gen3, OIC has separated its design time and runtime under different URLs.

2> The runtime URL is something like https://oic-dev-environment-ia.integration.us-region-1.ocp.oraclecloud.com/ic/api/xxxxx

3>Design time URL starts with design.integration and always has a query parameter representing the instance, 
such as https://design.integration.us-region-1.ocp.oraclecloud.com/ic/api/xxxxx/?integrationInstance=...

4> The first part of the URL https://design.integration.region.ocp.oraclecloud.com is your rest-server and the rest of the URL integrationInstance=NameOfServiceInstance contains the name of the service instance.

Example: https://design.integration.region.ocp.oraclecloud.com/?integrationInstance=NameOfServiceInstance

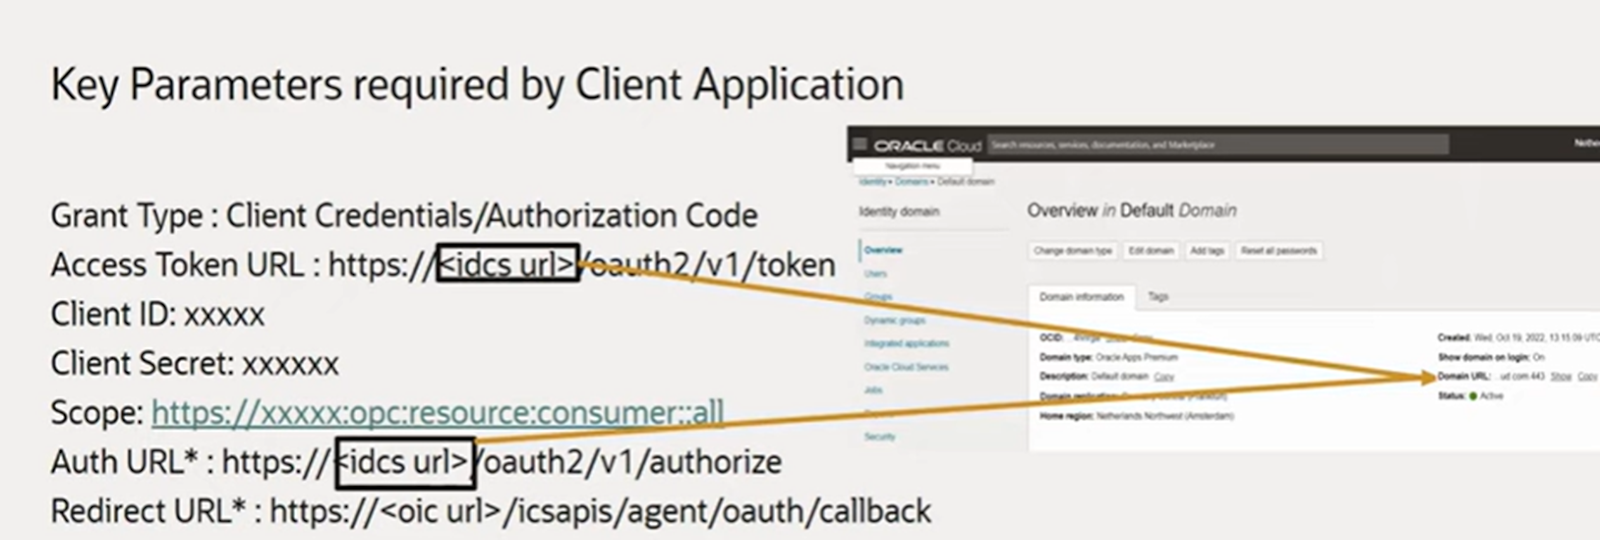
We require below 5 parameters from IAM 

Grant Type
Access Token URL
Client Id
Client Secret
Grant Type


Steps to Get OAUTH Parameters from IAM Console:

Login to :  https:[IDCS URL]/ui/v1/adminconsole

View the Oracle Cloud Services item in the left-hand navigation menu


go to 


For Scope , copy SCOPE value 
Uploading: 134341 of 134341 bytes uploaded.


To get client Id and Secret , see below


All Key Values in Nutshell


All Details:

Token URL : https://idcs-XXXXXX/oauth2/v1/token
Client ID:      1dxxxxxxxxxxxxxxxxxxxxxxx7c
Client Secret :  afxxxxxxxxxxxxxxxxxxxxxxxxxx17
scope: https://XXXXXXXXXXXXXXXXXXXXXXXXXXXXXXX:opc:resource:consumer::all

Now , Export VB application from GEN2 to GEN3 . 

Login to OIC application in GEN3 .


click on Visual Builder and go to service connection and see backend


Create one backend conection, This backend will act as a package or kind of single point of contact for GEN3 credentials.

We can create new service connection and refer this Backend . Or we can leverage this new backend connection in existing service connection. 


use OAUTH2.0 Client Credentials from Authentication:

Instance URL will be Design Time URL of OIC application 

https://*******************cloud.com 


Enter Client Id, Client Secret, Scope, Token URL as we have collected from IAM (see above point)


select connection type as "Dynamic, Service does not support CORS"


Now save it and close it.

Now go to service connection, and open existing service connection . 

Change the existing service connection to new BACKEND (which created above. i.e. OICGEN3)


Now go to ENDPOINTS in SERVER itself and enter endpoint, Let suppose we are GET as method to extract all integration details from a particular Lookups then we can leverage below.


For example if you want to call particular lookup which is holding all your integrations in OIC, then call that particular lookup and put name 

Make sure we need to provide 'integrationInstance' Name as "Static Parameter" in Backend itself.


To Retrieve lookup we can use oracle standard format.


Path: /ic/api/integration/v1/lookups/{name}

So our final URL will be like as below 

https://XXXXXXXX.oraclecloud.com/ic/api/integration/v1/lookups/TEST_CONFIG?expand=datarow&onlyData=true&integrationInstance=XXXXX

Run and test it . It will work succesfully.

Same thing we can achieve via POSTMAN , just use CLIENT CREDENTIALS as GRANT TYPE and fill all the information and generate TOKEN. it will work further.

Same Fashion we can use in OIC also, Just enter all information in REST CONNECTION TYPE and put mapping for "integrationInstance" name. It should work.

Thanks.

Happy Learning. 

For More information, please drop your comment here . 

Monday, 29 July 2024

How to Split CLOB column data into different rows - SQL PL SQL - Oracle

  SELECT DISTINCT

        PROJECT_NAME_ALIAS,

        USER_EMAIL,

        REGEXP_SUBSTR(MODULE_NAME, '[^:]+', 1, LEVEL) AS MODULE_NAME,

        LEVEL

    FROM 

        XXUSER_PROJECTS_MODULES

    WHERE 

       PROJECT_NAME_ALIAS like 'A%'

            CONNECT BY 

        REGEXP_SUBSTR(MODULE_NAME, '[^:]+', 1, LEVEL) IS NOT NULL

        AND PRIOR SYS_GUID() IS NOT NULL


        select * from XXUSER_PROJECTS_MODULES

        where project_name_alias like 'A%'


if modules are stored as below 


Thursday, 4 July 2024

How to add page number in rtf templates in body - Oracle - Fusion

 If there is a requirement to add current page number and total page number in body of RTF template not in header and footer. Please check following.

For current page number, use <fo:page-number xdofo:report-page-number="true"/>

For total page number, use <?fo:page-number-citation:xdofo:lastpage-totalpg?>

Wednesday, 3 July 2024

How to start new section in RTF template in oracle fusion

Hi Team, 

If you have requirement where you want to display new page for each invoice then below section is for you. 


Happy Learning. 

<LIST_G_INVOICE>
   <G_INVOICE>
      <BILL_CUST_NAME>Vision, Incusive </BILL_CUST_NAME>
      <TRX_NUMBER>234568</TRX_NUMBER>
      ...
   </G_INVOICE>
   <G_INVOICE>
      <BILL_CUST_NAME>BCD </BILL_CUST_NAME>
      <TRX_NUMBER>234</TRX_NUMBER>
      ...
   </G_INVOICE>
   ...
</LIST_G_INVOICE>
...

Each G_INVOICE element contains an invoice for a potentially different customer. To instruct BI Publisher to start a new section for each occurrence of the G_INVOICE element, add the @section command to the opening for-each statement for the group, using the following syntax:

<?for-each@section:group name?>

where group_name is the name of the element for which you want to begin a new section.

For example, the for-each grouping statement for this example is as follows:

<?for-each@section:G_INVOICE?>

The closing <?end for-each?> tag is not changed.

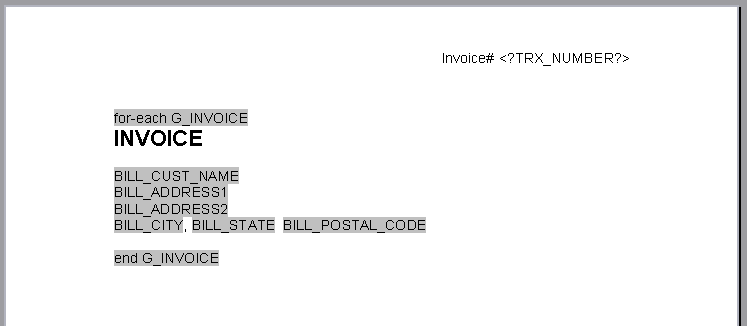
The following figure shows a sample template for batch reports:

Note:

The G_INVOICE group for-each declaration is still within the body of the report, even though the headers are reset by the command.

Description of GUID-4782470C-48F5-4F97-B5F6-98F94D1F05F4-default.gif follows


The following table describes the values of the form fields from the template in the previous figure (that shows a sample template for batch reports):

Default Text EntryForm Field Help TextDescription

for-each G_INVOICE

<?for-each@section:G_INVOICE?>

Begins the G_INVOICE group, and defines the element as a Section. For each occurrence of G_INVOICE, a new section is started.

Thursday, 27 June 2024

Few Dates format in RTF template Oracle fusion

 <?format-date:ASSIGNMENT_POSTING_DATE;’XDODEFDATE’?>

<?format-number:BASE_SALARY_NEW;’D999'?>


<?format-date: ACCT_DATE;’YYYY/MM/DD’?>


<?format-date:xdoxslt:sysdate_as_xsdformat();’DD MON YYYY’?>


<?format-date:<?format-date:ASSIGNMENT_START_DATE?;'DD-MON-YYYY'?>;'YYYY-MM-DD'?>


<?format-date:ASSIGNMENT_START_DATE;'DD-MON-YYYY'?>


<?format-date:PERIOD_START_DATE;'XDODEFDATE'?>


<?xdofx:to_date(COMP_1_COMPENSATION_EFF_DATE,'Mon YYYY' )?>


<?format-number:BASE_SALARY_NEW;’D99'?>


How to create dependent LOV in Oracle APEX fusion

 1. Create one lookup table and enter lookup_type column as per need .  For example below.

select LOOKUP_VALUE, lookup_code

from XXXX_APPLICATION_LOOKUP

where lookup_type= 'OFFERINGS'

2. Select column which is based on above "OFFERINGS", select type as "LOV"

3. Go to Next Column which is based on previous column , Step 2. (output of step2)

4. Put Value in any "ATTRIBUTES" say ATTRIBUTE1 in XXXX_APPLICATION_LOOKUP.

That value is based on Master value and will act as Mapping

Say : OFFERING is ERP 

and MODULE is Finance.

so put value in "LOOKUP_TYPE" as "MODULE" and put 

Lookup_value as "Finance"

and in ATTRIBUTE1 as "ERP"

it will create as MAPPING between two datas.

put below query in target LOV (or Child LOV)

where P9_REGION in below query is Name of Master LOV 

Query :


select lookup_value , lookup_code

from XXXX_APPLICATION_LOOKUP

where lookup_type= 'COUNTRY' 

and attribute1 in (select regexp_substr (

           :P9_REGION,

           '[^:]+',

           1,

           level

         ) value

  from  dual

  connect by level <=

    length ( :P9_REGION ) - length ( replace ( :P9_REGION, ':' ) ) + 1)


How to create TILES in APEX Oracle

 1. Create New Application and its respective page.

2. In the "Region" Create Type as "Card" and add below query .

The more the unions, more the TILES.

In below Query : 

"'f?p=&APP_ID.:33:&SESSION.::&DEBUG.:::' target_url"

33 is page number where your TILE will navigate 

Query :

select

  -- data

  1 card_primary_key,    -- primary key

  null card_secondary_key,  -- secondary key if needed

  'Manage Projects' card_title,          -- title

  null card_subtitle,       -- subtitle

  'View Assigned Projects' card_body,           -- card body text

  null card_secondary_body, -- card secondary text, positioned near bottom

  'fa fa-plus-square' card_icon ,          -- icon class, e.g. fa-cloud

  'f?p=&APP_ID.:33:&SESSION.::&DEBUG.:::' target_url

from dual

union


select

  -- data

  2 card_primary_key,    -- primary key

  null card_secondary_key,  -- secondary key if needed

  'Project Access Request' card_title,          -- title

  null card_subtitle,       -- subtitle

  'Submit Project Access Request' card_body,           -- card body text

  null card_secondary_body, -- card secondary text, positioned near bottom

  'fa fa-bar-chart' card_icon ,          -- icon class, e.g. fa-cloud

  'f?p=&APP_ID.:17:&SESSION.::&DEBUG.:::' target_url

from dual


Refer Below as screenshot


Monday, 10 June 2024

Convert Number into words which will help in check printing in oracle fusion BIP template

<?xdofx:to_check_number(SALARY_AMOUNT,’JPY’,’CASE_INIT_CAP’)?>


<?xdofx:to_check_number(amount, precisionOrCurrency, caseType, decimalStyle)?>
AttributeDescriptionValid Value

amount

The number to be transformed.

Any number

precisionOrCurrency

For this attribute you can specify either the precision, which is the number of digits after the decimal point; or the currency code, which governs the number of digits after the decimal point. The currency code does not generate a currency symbol in the output.

An integer, such as 2; or a currency code, such as 'USD'.

caseType

The case type of the output.

Valid values are: 'CASE_UPPER', 'CASE_LOWER', 'CASE_INIT_CAP'

decimalStyle

Output type of the decimal fraction area.

Valid values are: 'DECIMAL_STYLE_FRACTION1', 'DECIMAL_STYLE_FRACTION2', 'DECIMAL_STYLE_WORD'

The following table displays the example function as entered in an RTF template and the returned output.

RTF Template EntryReturned Output

<?xdofx:to_check_number(12345.67, 2)?>

Twelve thousand three hundred forty-five and 67/100

<?xdofx:to_check_number(12345.67, 'USD')?>

Twelve thousand three hundred forty-five and 67/100

<?xdofx:to_check_number(12345, 'JPY', 'CASE_UPPER')?>

TWELVE THOUSAND THREE HUNDRED FORTY-FIVE

<?xdofx:to_check_number(12345.67, 'EUR', 'CASE_LOWER', 'DECIMAL_STYLE_WORDS')?>

twelve thousand three hundred forty-five and sixty-seven

Thursday, 6 June 2024

How to get Invoice Amount and its tax from payables in oracle fusion and from SLA tables

 select distinct aia.invoice_id,

aia.INVOICE_CURRENCY_CODE "Functional Currency"

,(select distinct name from xle_entity_profiles       

where legal_entity_id in (    select default_legal_context_id from hr_operating_units   

where organization_id=aia.org_id))company 

,aila.tax_classification_Code  "Tax Code"

,aia.invoice_num "Transaction Number"

,aia.invoice_type_lookup_code "Transaction Class"

,'' Related_Transaction

,aia.invoice_date "Transaction_Date"

,(Select hp.party_name from hz_parties hp where aia.party_id = hp.party_id and rownum=1) "Billing Partner Name"

,zl.TAX_REGISTRATION_NUMBER

,aila.Amount "Taxable_Amt"

,zl.Tax_Amt

,zl.Tax_regime_code

,zl.tax

,(

Select distinct gcc.segment4 

from gl_code_combinations gcc

where 1=1

and gcc.code_combination_id=aida.DIST_CODE_COMBINATION_ID

and aida.INVOICE_LINE_NUMBER=aila.LINE_NUMBER

and aida.LINE_TYPE_LOOKUP_CODE  in ('ITEM')

and aida.invoice_id=aila.invoice_id

and aila.tax_classification_code is not null

)"Line GL Account"

,(

Select distinct gcc.segment3

from gl_code_combinations gcc

where 1=1

and gcc.code_combination_id=aida.DIST_CODE_COMBINATION_ID

and aida.INVOICE_LINE_NUMBER=aila.LINE_NUMBER

and aida.LINE_TYPE_LOOKUP_CODE  in ('ITEM')

and aida.invoice_id=aila.invoice_id

and aila.tax_classification_code is not null

)"Line Cost Centre"

,(

Select distinct gcc.segment1||'.'||gcc.segment2||'.'||gcc.segment3||'.'||gcc.segment4||'.'||gcc.segment5||'.'||gcc.segment6||'.'||gcc.segment7||'.'||gcc.segment8 

from gl_code_combinations gcc

where 1=1

and gcc.code_combination_id=aida.DIST_CODE_COMBINATION_ID

and aida.INVOICE_LINE_NUMBER=aila.LINE_NUMBER

and aida.LINE_TYPE_LOOKUP_CODE  in ('ITEM')

and aida.invoice_id=aila.invoice_id

and aila.tax_classification_code is not null

)"Line Account Combination"

,(select distinct gcc.segment4 from gl_code_combinations gcc where code_combination_id  IN

(SELECT tax_account_ccid

FROM zx_rates_b RB, ZX_ACCOUNTS TA

WHERE TA.TAX_ACCOUNT_ENTITY_CODE = 'RATES'

and TA.TAX_ACCOUNT_ENTITY_ID = RB.tax_rate_id

and rb.tax_rate_code=aila.tax_classification_Code

and ta.ledger_id=zl.ledger_id

and rb.ACTIVE_FLAG='Y')

) "Tax GL Account"

,(select distinct gcc.segment3 from gl_code_combinations gcc where code_combination_id  IN

(SELECT tax_account_ccid

FROM zx_rates_b RB, ZX_ACCOUNTS TA

WHERE TA.TAX_ACCOUNT_ENTITY_CODE = 'RATES'

and TA.TAX_ACCOUNT_ENTITY_ID = RB.tax_rate_id

and rb.tax_rate_code=aila.tax_classification_Code

and ta.ledger_id=zl.ledger_id

and rb.ACTIVE_FLAG='Y')

) "Tax Cost Centre"

,(select distinct gcc.segment1||'.'||gcc.segment2||'.'||gcc.segment3||'.'||gcc.segment4||'.'||gcc.segment5||'.'||gcc.segment6||'.'||gcc.segment7||'.'||gcc.segment8 from gl_code_combinations gcc where code_combination_id  IN

(SELECT tax_account_ccid

FROM zx_rates_b RB, ZX_ACCOUNTS TA

WHERE TA.TAX_ACCOUNT_ENTITY_CODE = 'RATES'

and TA.TAX_ACCOUNT_ENTITY_ID = RB.tax_rate_id

and rb.tax_rate_code=aila.tax_classification_Code

and ta.ledger_id=zl.ledger_id

and rb.ACTIVE_FLAG='Y')

) "Tax Account Combination"

from ap_invoices_all aia

,ap_invoice_lines_all aila

,ZX_LINES zl

,xla_transaction_entities xte

,xla_Ae_headers xah

,xla_events xe

,ap_invoice_distributions_all aida

--,xla_ae_lines xal

where 1=1 

--and aila.tax_classification_code is not null

--and aia.invoice_num in ('Test tax invoice','Test9879','Test9878','Test098')

--and aia.invoice_num in ('Tax Test Jun-24')

And aia.invoice_num=zl.trx_number

and zl.trx_id = aila.invoice_id

and zl.trx_line_id = aila.line_number

and zl.entity_code ='AP_INVOICES'

and aia.invoice_id=aila.invoice_id

and aila.invoice_id=aida.invoice_id

and aila.line_number=aida.invoice_line_number

and upper(aia.approval_status) IN ('APPROVED','CANCELLED')

and aia.invoice_id = xte.source_id_int_1

and xah.gl_transfer_status_code = 'Y'

and xte.LEDGER_ID =aia.SET_OF_BOOKS_ID

AND XTE.ENTITY_CODE='AP_INVOICES'

AND xe.ENTITY_ID                =XTE.ENTITY_ID

AND xe.EVENT_ID                 =xah.EVENT_ID

--and xal.ae_header_id=xah.ae_header_id

and xah.entity_id = xte.entity_id

and aia.org_id = :p_Business_unit

and aida.accounting_date between :p_from_date and :p_to_date

Tuesday, 28 May 2024

How to set auto width of column in RTF Template in oracle fusion

 Insert Table in the RTF template , Insert XML schema for columns. 

For example : 


Now click on individual cells and select TABLE PROPERTIES , click on Column and change the "Measure in:" : Percent 


We have Previous Column and Next column in the above screenshot, Click on next or previous and change the "Preferred Width" in %. It will change dynamically. 

Above screenshot is for Column1 and then we can navigate to further columns.

See below as example :


Friday, 17 May 2024

Calling of subtemplate from Main template in BI Publisher in Oracle Fusion

 Sometimes there are requirement where header and footer are changing and rest content/body of template is same.

For example there are multiple addresses for any parent company.

In that case we can create subtemplate and call that subtemplate in parent template.

Creating Subtemplate:

In RTF template , do below

<?template:MyAddressUS?>
My Company
500 Main Street
Any City, CA 98765
<?end template?>                                                                    
?template:MyAddressIndia?>
My Company
500 Main Street
India
<?end template?>    
Now we can save that template in fusion, Go to oracle fusion

its extension will be .xsb

Now we need to call that template in our main template,
wherever we want to call in the main template

Calling of Subtemplate from Main template:
In the Main template enter the following import statements in the form field or directly
anywhere in the template.

  1. <?import:xdoxsl:///Customer Reports/Templates/Sub_Template_Address_XXX.xsb?>
    
  2. In Main template where you want to show that address, use below Call command
  3. <?call-template:MyAddressUS?>
  4. At runtime, parent template will take care of those path.
  5. To handle parameterized layout , use below command
  6. In the RTF template define a parameter using syntax - 

<?param@begin:ParameterName?>

For example:

<?param@begin:DeptName?>


Happy Learning .


Monday, 13 May 2024

How to invoke parametric BIP Report from ESS job

 Hi Team, 

First create Data mode and report with parameters. 

Let suppose 3 parameters

business Unit Id 
From date 
To Date


Now we need to create parametric ESS job with 3 parameters itself. 
Please make sure that order of ESS Job parameters and BIP Data model should be same. 

In ESS Job , it should be 

Business Unit Id

From Date 

To Date.


Please make sure to provide correct path for BIP report also.

In ESS job :
Path should be : /oracle/apps/ess/custom/Financials/XXXX
if report comes under financials and then XXXX

Give exact xdo path for report id 


Happy Learning.
 

Passing date type parameter from an ESS job to BIP SQL data model in oracle fusion application

 Hi Team , 

When you are passing date parameter from ESS Job to BIP report then it is not fetching data due to wrong parameters.

When opening XML it is showing


Although we have given DATE parameter in ESS job as 


Still it is showing in XML document as wrong format date. 

Solution: Make the date format in SQL BIP data model as yyyy-MM-dd 


and in ESS Job also , select Date parameter as yyyy-MM-dd

and then submit ESS job, it will display output also and see XML also.

It will display correct output. 

Thanks and Happy Reading.


How to use Date function in excel BI Publisher


Formatting Dates

Excel cannot recognize canonical date format. If the date format in the XML data is in canonical format, that is, YYYY-MM-DDThh:mm:ss+HH:MM, you must apply a function to display it properly.

One option to display a date is to use the Excel REPLACE and SUBSTITUTE functions. This option retains the full date and timestamp. If you only require the date portion in the data (YYY-MM-DD), then another option is to use the DATEVALUE function. The following example shows how to use both options.

Example: Formatting a Canonical Date in Excel

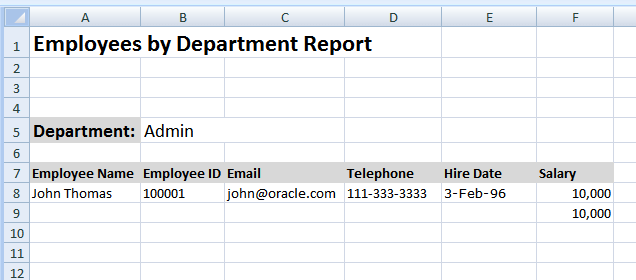
Using the Employee by Department template and data from the first example, this procedure adds the HIRE_DATE element to the layout and displays the date as shown in Column E of Figure 6-18.

Figure 6-18 The Employee by Department Template Showing the Hire Date

Description of Figure 6-18 follows
Description of "Figure 6-18 The Employee by Department Template Showing the Hire Date"

To format the date:

  1. Add a column to the table in your layout for HIRE_DATE.

  2. In the table row where the data is to display, use the Template Builder to insert the HIRE_DATE field.

    Note:

    If you are not using the Template Builder, copy and paste a sample value for HIRE_DATE from the XML data into the cell that is to display the HIRE_DATE field. For example:

    Copy and paste

    1996-02-03T00:00:00.000-07:00

    into the E8 cell.

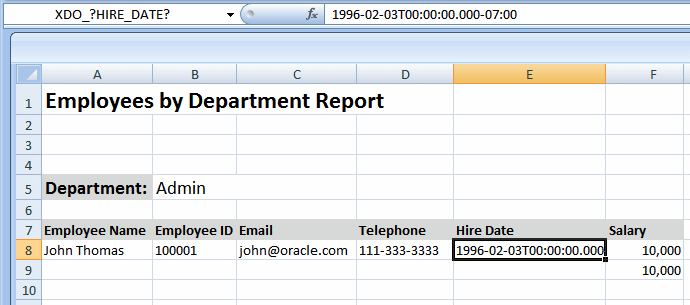
    Assign the cell the defined name XDO_?HIRE_DATE? to map it to the HIRE_DATE element in the data.

    The inserted field is shown in Figure 6-19.

    Figure 6-19 Inserting the HIRE_DATE Field

    Description of Figure 6-19 follows
    Description of "Figure 6-19 Inserting the HIRE_DATE Field"

    If you do nothing else, the HIRE_DATE value is displayed as shown. To format the date as "3-Feb-96", you must apply a function to that field and display the results in a new field.

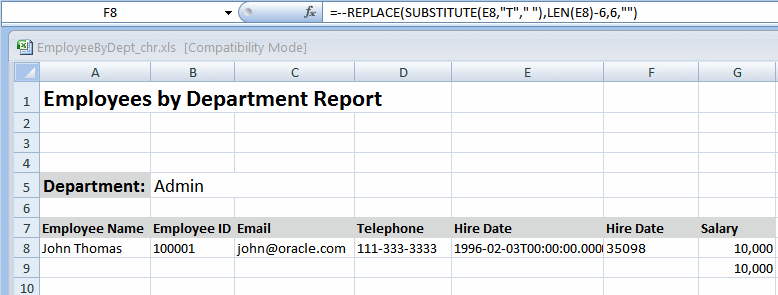
  3. Insert a new Hire Date column. This is now column F, as shown in Figure 6-20.

    Figure 6-20 The New Hire Date Column in Column F

    Description of Figure 6-20 follows
    Description of "Figure 6-20 The New Hire Date Column in Column F"

  4. In the new Hire Date cell (F8), enter one of the following Excel functions:

    • To retain the full date and timestamp, enter:

      =--REPLACE(SUBSTITUTE(E8,"T"," "),LEN(E8)-6,6,"")
      
    • To retain only the date portion (YYY-MM-DD), enter:

      =DATEVALUE(LEFT(E8,10))
      

    Notice that in both functions, "E8" refers to the cell that contains the value to convert.

    After you enter the function, it populates the F8 cell as shown in Figure 6-21.

    Figure 6-21 Hire Date Cell (F8) Populated

    Description of Figure 6-21 follows
    Description of "Figure 6-21 Hire Date Cell (F8) Populated"

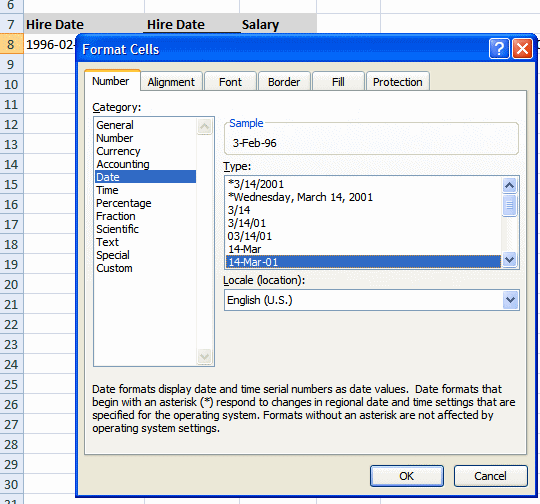
  5. Apply formatting to the cell.

    Right-click the F8 cell. From the menu, select Format Cells. In the Format Cells dialog, select Date and the desired format, as shown in Figure 6-22.

    Figure 6-22 Applying the Format for the Date in the Format Cells Dialog

    Description of Figure 6-22 follows
    Description of "Figure 6-22 Applying the Format for the Date in the Format Cells Dialog"

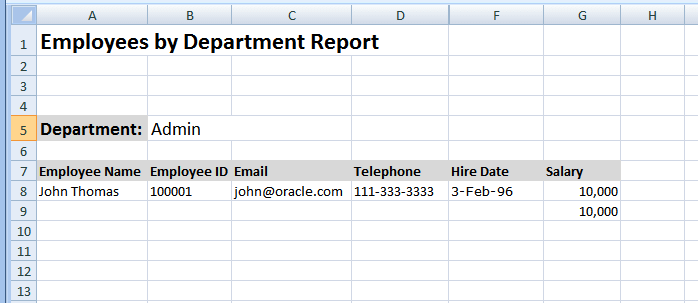
    The sample data in the F8 cell now displays as 3-Feb-96.

  6. Hide the E column, so that report consumers do not see the canonical date that is converted.

    Figure 6-23 shows the template with column E hidden.