Tuesday, 28 May 2024

How to set auto width of column in RTF Template in oracle fusion

 Insert Table in the RTF template , Insert XML schema for columns. 

For example : 


Now click on individual cells and select TABLE PROPERTIES , click on Column and change the "Measure in:" : Percent 


We have Previous Column and Next column in the above screenshot, Click on next or previous and change the "Preferred Width" in %. It will change dynamically. 

Above screenshot is for Column1 and then we can navigate to further columns.

See below as example :


Friday, 17 May 2024

Calling of subtemplate from Main template in BI Publisher in Oracle Fusion

 Sometimes there are requirement where header and footer are changing and rest content/body of template is same.

For example there are multiple addresses for any parent company.

In that case we can create subtemplate and call that subtemplate in parent template.

Creating Subtemplate:

In RTF template , do below

<?template:MyAddressUS?>
My Company
500 Main Street
Any City, CA 98765
<?end template?>                                                                    
?template:MyAddressIndia?>
My Company
500 Main Street
India
<?end template?>    
Now we can save that template in fusion, Go to oracle fusion

its extension will be .xsb

Now we need to call that template in our main template,
wherever we want to call in the main template

Calling of Subtemplate from Main template:
In the Main template enter the following import statements in the form field or directly
anywhere in the template.

  1. <?import:xdoxsl:///Customer Reports/Templates/Sub_Template_Address_XXX.xsb?>
    
  2. In Main template where you want to show that address, use below Call command
  3. <?call-template:MyAddressUS?>
  4. At runtime, parent template will take care of those path.
  5. To handle parameterized layout , use below command
  6. In the RTF template define a parameter using syntax - 

<?param@begin:ParameterName?>

For example:

<?param@begin:DeptName?>


Happy Learning .


Monday, 13 May 2024

How to invoke parametric BIP Report from ESS job

 Hi Team, 

First create Data mode and report with parameters. 

Let suppose 3 parameters

business Unit Id 
From date 
To Date


Now we need to create parametric ESS job with 3 parameters itself. 

Please make sure that order of ESS Job parameters and BIP Data model should be same. 

In ESS Job , it should be 

Business Unit Id

From Date 

To Date.


Please make sure to provide correct path for BIP report also.

In ESS job :
Path should be : /oracle/apps/ess/custom/Financials/XXXX
if report comes under financials and then XXXX

Give exact xdo path for report id 


Happy Learning.
 

Passing date type parameter from an ESS job to BIP SQL data model in oracle fusion application

 Hi Team , 

When you are passing date parameter from ESS Job to BIP report then it is not fetching data due to wrong parameters.

When opening XML it is showing


Although we have given DATE parameter in ESS job as 


Still it is showing in XML document as wrong format date. 

Solution: Make the date format in SQL BIP data model as yyyy-MM-dd 


and in ESS Job also , select Date parameter as yyyy-MM-dd

and then submit ESS job, it will display output also and see XML also.

It will display correct output. 

Thanks and Happy Reading.


How to use Date function in excel BI Publisher


Formatting Dates

Excel cannot recognize canonical date format. If the date format in the XML data is in canonical format, that is, YYYY-MM-DDThh:mm:ss+HH:MM, you must apply a function to display it properly.

One option to display a date is to use the Excel REPLACE and SUBSTITUTE functions. This option retains the full date and timestamp. If you only require the date portion in the data (YYY-MM-DD), then another option is to use the DATEVALUE function. The following example shows how to use both options.

Example: Formatting a Canonical Date in Excel

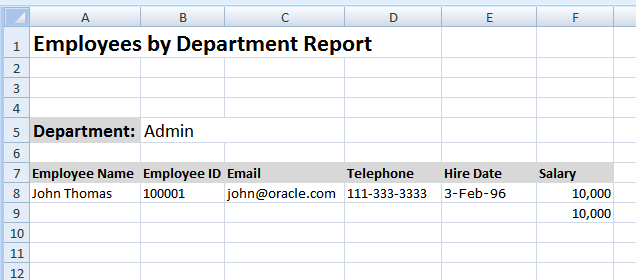
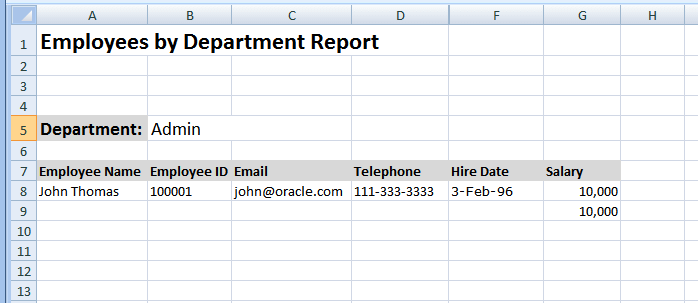
Using the Employee by Department template and data from the first example, this procedure adds the HIRE_DATE element to the layout and displays the date as shown in Column E of Figure 6-18.

Figure 6-18 The Employee by Department Template Showing the Hire Date

Description of Figure 6-18 follows
Description of "Figure 6-18 The Employee by Department Template Showing the Hire Date"

To format the date:

  1. Add a column to the table in your layout for HIRE_DATE.

  2. In the table row where the data is to display, use the Template Builder to insert the HIRE_DATE field.

    Note:

    If you are not using the Template Builder, copy and paste a sample value for HIRE_DATE from the XML data into the cell that is to display the HIRE_DATE field. For example:

    Copy and paste

    1996-02-03T00:00:00.000-07:00

    into the E8 cell.

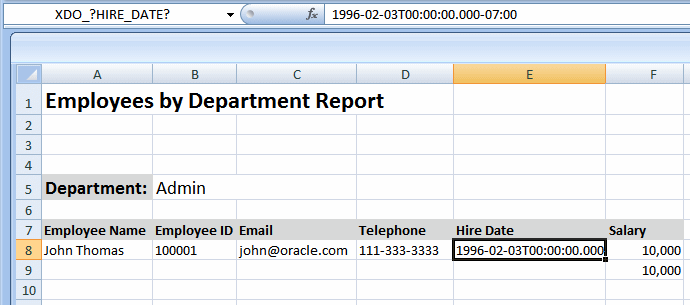
    Assign the cell the defined name XDO_?HIRE_DATE? to map it to the HIRE_DATE element in the data.

    The inserted field is shown in Figure 6-19.

    Figure 6-19 Inserting the HIRE_DATE Field

    Description of Figure 6-19 follows
    Description of "Figure 6-19 Inserting the HIRE_DATE Field"

    If you do nothing else, the HIRE_DATE value is displayed as shown. To format the date as "3-Feb-96", you must apply a function to that field and display the results in a new field.

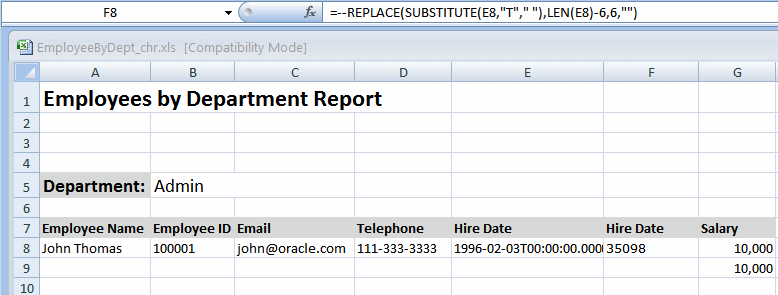
  3. Insert a new Hire Date column. This is now column F, as shown in Figure 6-20.

    Figure 6-20 The New Hire Date Column in Column F

    Description of Figure 6-20 follows
    Description of "Figure 6-20 The New Hire Date Column in Column F"

  4. In the new Hire Date cell (F8), enter one of the following Excel functions:

    • To retain the full date and timestamp, enter:

      =--REPLACE(SUBSTITUTE(E8,"T"," "),LEN(E8)-6,6,"")
      
    • To retain only the date portion (YYY-MM-DD), enter:

      =DATEVALUE(LEFT(E8,10))
      

    Notice that in both functions, "E8" refers to the cell that contains the value to convert.

    After you enter the function, it populates the F8 cell as shown in Figure 6-21.

    Figure 6-21 Hire Date Cell (F8) Populated

    Description of Figure 6-21 follows
    Description of "Figure 6-21 Hire Date Cell (F8) Populated"

  5. Apply formatting to the cell.

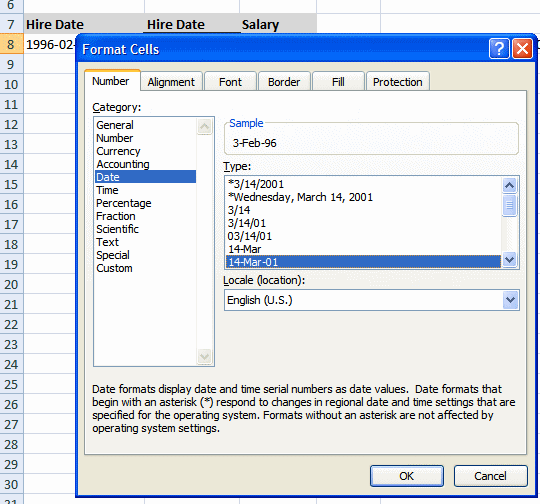
    Right-click the F8 cell. From the menu, select Format Cells. In the Format Cells dialog, select Date and the desired format, as shown in Figure 6-22.

    Figure 6-22 Applying the Format for the Date in the Format Cells Dialog

    Description of Figure 6-22 follows
    Description of "Figure 6-22 Applying the Format for the Date in the Format Cells Dialog"

    The sample data in the F8 cell now displays as 3-Feb-96.

  6. Hide the E column, so that report consumers do not see the canonical date that is converted.

    Figure 6-23 shows the template with column E hidden.

How to create excel template in BI Publisher

 Step1: First create BIP report with SQL query in BI publisher in oracle fusion.

Step2: Download XML data from BIP output.

Step3: Open Excel template 

Step4: Upload XML data into excel template .

Navigation: Go to BI Publisher>Sample XML> Select XML file and click Ok.

Then Click on Field, it will be like as below


Step5: Right click on tab and select unhide


Step 6: Drag and drop all the required column into sheet1


Now to create a group , select the entire row and cells and click on repeating group


select group by for any columns you want to group by.

Run the excel report. It will work . 


Wednesday, 8 May 2024

How to use Format-number function with if else condition in rtf

If User want to show in two different columns, Debit and credit columns then 


Debit column will be :

 <?if: CD_TRX_AMOUNT>=0?>

<?format-number(CD_TRX_AMOUNT,"### ,###.00")?>

<?end if?>

<?if: CD_TRX_AMOUNT<0?>

<?''?>

<?end if?>


Credit column will be:

<?if: CD_TRX_AMOUNT<0?>
<?format-number(CD_TRX_AMOUNT,"-### ,###.00")?>
<?end if?>
<?if: CD_TRX_AMOUNT>=0?>
<?''?>
<?end if?>

If in same column then 
<?if: CF_TOTAL>=0?>
<?format-number(CF_TOTAL,"### ,###.00")?>
<?end if?>
<?if: CF_TOTAL<0?>
<?format-number(CF_TOTAL,"-### ,###.00")?>
<?end if?>

Tuesday, 7 May 2024

How to format Date in BI publisher template in RTF in oracle fusion

 If you have date format in your data model then do not make any changes in data model. Let it be whatever it is.


For example : Select invoice_date from AP_INVOICES_ALL

so invoice date output should be : 2012-04-05T18:17:12.000+00:00

Now take XML data from the report and put that XML data into RTF template. 

Pull Tag Invoice_date into RTF template and change it properties like as below


Syntax: <?xdofx:to_date(TRX_DATE,'DD-Mon-YY' )?>

it will work, Now if there are multiple templates then we can change the data format for each template in template itself.
If we change date format via SQL Query (Data Model) then in that case it will work but it will be static not dynamically.


We can also try <?format-date:ASSIGNMENT_START_DATE?;'DD-MON-YYYY'?> if that works. But make sure data format in Data model should be standard.